The Gizmo Library
In this tutorial, we will introduce the Gizmo block library and the Say block. You will learn how to get input from your gamepad and how to send text back to your computer to help debug your code.
The Say Block
When your Gizmo is connected to a computer, your MicroBlocks programs are able to send information back to your computer. The messages your Gizmo sends will show up in dialog bubbles above the stacks which create them.
The Say block can be found in the Output category of the block palette.

The white bubble in the say block is the message that will be sent to your computer. It can be text, a number, or a value from another block.
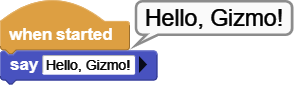
You can test the say block by adding a When Started hat block and then snapping a Say block under it with a message of your choice. When you run your program, a bubble with your message should appear above the stack.
Reporter Blocks
We've covered hat blocks, C-blocks, and command blocks in previous chapters. The last type of block we need to introduce are called reporter blocks.
A reporter block looks like a rectangle with rounded corners. These blocks produce values which other blocks can use. Generally, when you have blocks which use values, such as the Say blocks' message, you can drop a reporter block in as the value.
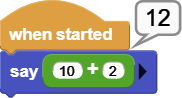
To see this in action, open the Operators category of the block palette and drag an addition block into the Say block's message. Add whatever numbers you want into the addition block and run the program. The stack's output will show the result of the addition.
The Gizmo Block Library
There are more blocks built into MicroBlocks beyond the default categories you see in the block palette. The Gizmo block library adds blocks for using Gizmo-specific features. When you connect to a Gizmo from the editor, it should add the Gizmo library to your block palette automatically. If you want to add the library without a Gizmo connected, click the plus button next to "Libraries" in the block palette. Under "Kits and Boards", you'll find the Gizmo library.
The Gizmo library provides command and reporter blocks for
- Using gamepad inputs
- Controlling motors and servos
- Reading ADC ports
- Reading and setting GPIO ports
Logging Gamepad State
Let's put everything we've introduced here together in a program that says whether a button on our Gizmo is being pressed.
To do this, start with a When Started hat block and add a Forever loop block under that.
In the loop, add a Say block and drag a Gamepad Button block from the Gizmo library into the Say block's message. The Gamepad Button block has a dropdown where you can choose which button it will check. Change that dropdown so our program is reading the A button.
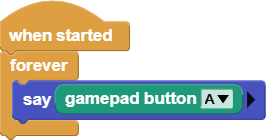
If you run this program, an output bubble will pop up that says "true" when the button is pressed and "false" when it is not.
note
To run this program, you will need the Gizmo to be connected to your driver station. You will need to connect your Gizmo to a battery and turn both the Gizmo and the driver station on.
Recap
In this tutorial, we've introduced the Gizmo block library and the Say block. With these new tools, we wrote our first MicroBlocks program that uses the Gizmo's gamepad.