Hello World
Let's begin creating a simple MicroBlocks program for your Gizmo. A common beginner program when working with microcontrollers is blinking an LED. Conveniently, the Gizmo's student processor has an LED built in to it. This lesson will walk you through creating and running a MicroBlocks program that blinks the built in LED. This code won't require any extra hardware plugged into your Gizmo. You will only need the Gizmo itself and the USB programming cable.
Connect the USB programming cable to the student processor on your Gizmo and plug it into the computer. Connect the MicroBlocks editor to your Gizmo following the instructions in the Setup chapter.
Starting a Stack: Hat Blocks
MicroBlocks programs are made of stacks of blocks. At the top of each stack is a block which decides when the stack should start running. This kind of block is called a "hat block". The most commonly used hat block is the "When Started" block. This block runs its stack when the program starts running, usually when your Gizmo is powered on.

To start your program, open the Control category in the block palette and drag a When Started block into the programming area of the editor.
Repeating Code with Loop Blocks
Another type of block you'll find in the Control category are C-blocks. These blocks are shaped like the letter C and you can place stacks of blocks in the opening. The C-block will decide when the stack inside of it is run.
For this program, we'll use the Forever block. This block will run the stack within it over and over again until a block within the stack escapes the loop or the program is stopped.

Drag a Forever block from the block palette and snap it to the bottom of the When Started hat block.
Controlling the Built in LED
Blocks in the Control category effect when and how our programs are run, but they don't make our Gizmo actually do anything. For our program to do anything, we need to use command blocks.
In the Output category of the block palette, there is a command block for turning the built in LED on and off, called "set user LED".

The toggle switch on this block tells the block whether it should turn the LED on or off. We want our LED to blink, so we need to turn it on then turn it off. Drag two copies of the Set user LED block into the Forever block. The first copy should have the toggle switch on and the second should have it off.
Slowing Down Our Code
If we were to run the program as it stands, the LED would be turning on and off faster than our eyes can see. It would just look always on to us. To make our LED actually look like it's blinking, we need our program to wait a bit before changing the LED's state. We can do this with the Wait Milliseconds command block, found in the Control category of the block palette. This block tells our program to wait for the given number of milliseconds before it moves on to the next block in the stack.
Add a copy of the Wait Milliseconds block after each copy of the Set User LED block in your program. Set the wait time in each block to 1000 so the LED will stay on and off for a full second each.
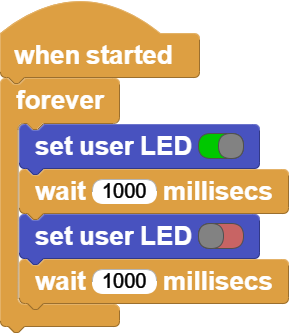
Here is our full blink program:
When you press the run button in the MicroBlocks editor, you should now see the built in LED of the student processor blink.
Recap
In this example, we've learned about hat blocks, c-blocks, and command blocks. We used examples of each type of block to control the built in LED of our student processor. The overall structure of this program - a Forever block under a When Started hat - will show up in many MicroBlocks programs for the Gizmo.