Spin a Wheel
In the previous tutorial we used some simple functions to turn a light on and off. Lets use some more advanced code to now control a motor. In this program we'll make use of a VEX MC-29 motor controller. These motor controllers use a Pulse Width Modulation (PWM) signal to determine direction and magnitude of the motor rotation they control.
For this program, we're going to use two new modules: pwmio and adafruit_motor.
The pwmio Module
PWM is a simple way to send an analog signal over a digital pin. It is commonly used for controlling motors, servos, and other actuators. The pwmio module provides the PWMOut class to efficiently generate PWM signals on a pin using our microcontroller's built-in timers. A timer is a dedicated piece of hardware that accurately keeps track of time without the main processor having to think about it. Most microcontrollers use timers to get very accurate PWM signals while the main code can work on other tasks. There are two important values for us to control with a PWMOut object: frequency and duty cycle.
Frequency is the number of times each second that the signal changes from low to high and back to low. This is measured in Hertz (Hz). One Hertz means "once per second."
Duty Cycle is the fraction of the total pulse time where the signal is held high. 0% duty cycle is a signal that is always low. 100% duty cycle is a signal that is always high. 50% duty cyclce is a signal that spends an equal amount of time high and low.
While PWM is an important concept to understand in robotics, we don't need to use it directly for controlling motors. We introduce this module here because it is used by the adafruit_motor module.
API documentation for the pwmio module is available here.
The adafruit_motor Module
The adafruit_motor module provides tools for controlling a variety of types of motors. We will use the adafruit_motor.servo module specifically.
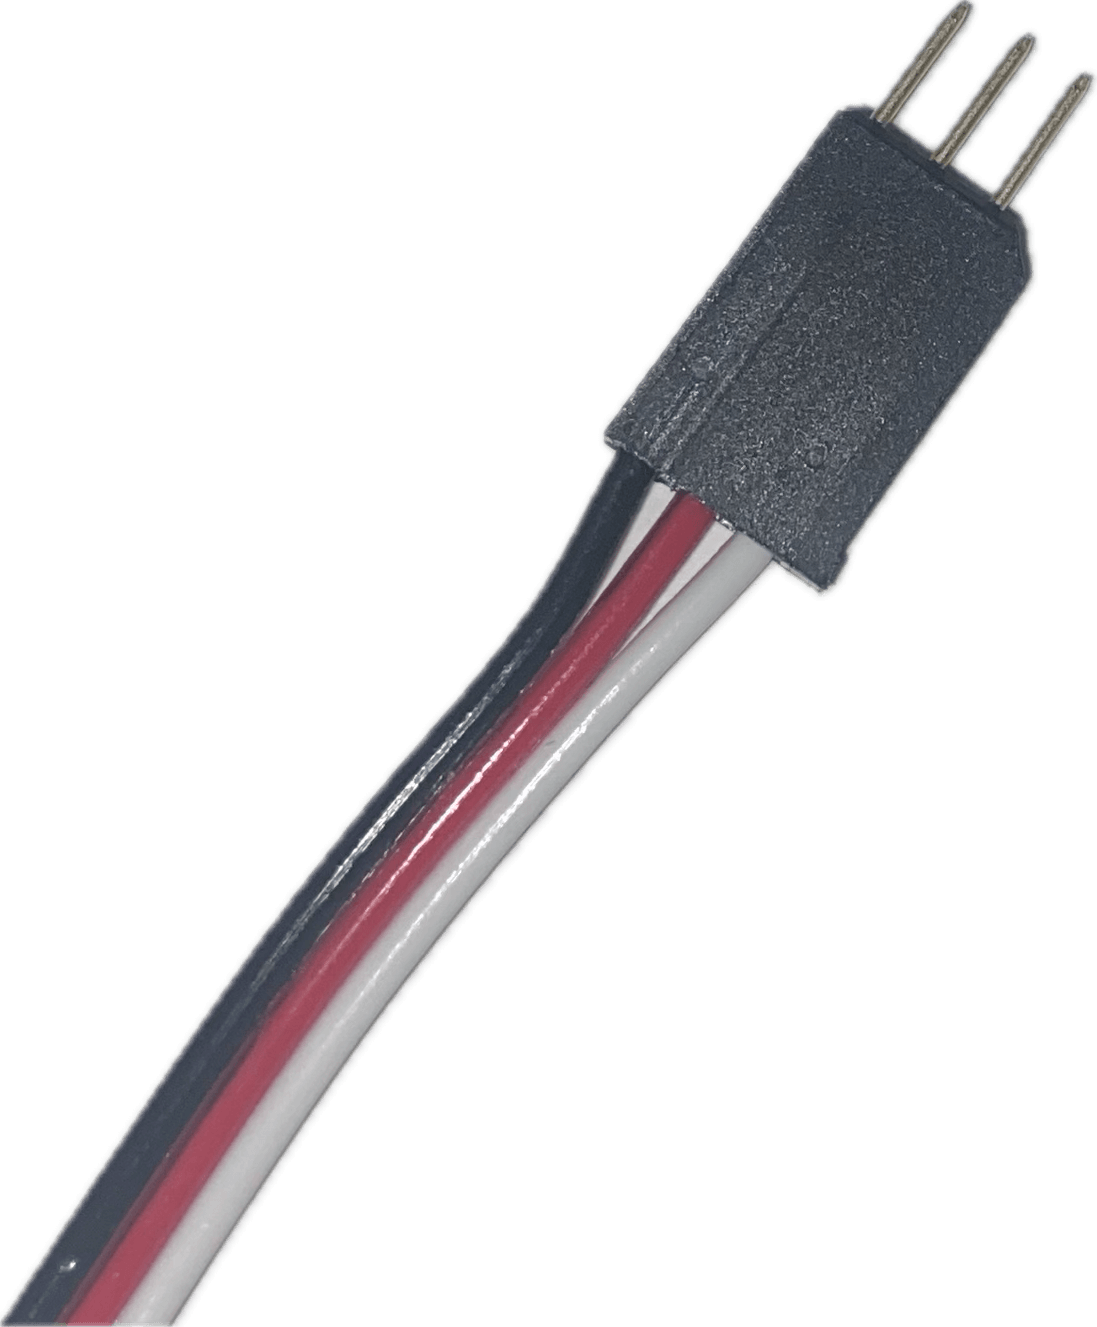
Why would we use a "servo" module for controlling our motors? In our case, it's because they use the same control interface. The Vex MC29 makes our DC gear motors behave like "continuous rotation servos" by using PWM to control them. You have probably seen servo connectors like the ones on the Vex MC29 before. This is a standard style of connector that is very popular for remote control cars and planes. The red and black wires provide power to the servo / motor and the white wire carries a PWM signal to control the servo / motor.
Servos control their position based on the signal they receive. We can control servos using the Servo class in adafruit_motor.servo. It has a property called angle that lets us set the position of the servo. Another property called actuation_range tells the Servo object how far the physical servo is able to move, so the code knows how to convert our angles into PWM signals.
For controlling motors, we can use the ContinousServo class in adafruit_motor.servo. It has a property called throttle which controls the speed of the motor. throttle can be set to any value between -1.0 and 1.0. Positive numbers will make the motor spin one direction and negative numbers will make the motor spin the other direction. Zero throttle will stop the motor.
Both of these objects are created by giving them a PWMOut object connected to a pin. Optionally, you can also tell them the minimum and maximum pulse widths in milliseconds.
API documentation for the adafruit_motor module is available here.
Looping Over Numbers
A common need in programs is looping over a range of numbers. This could be just because we need to repeat some action a certain number of times, or to loop through the elements in a list of items, for example. In Python, we can do this with a for loop and the range function.
A for loop, in Python, runs the body of its loop once for each element in a container. If you give the list of numbers [1, 2, 3, 4], the loop will run four times.
# This loop will run 4 times
for i in [1, 2, 3, 4]:
  # i holds the current element from the list
  print(i)
# This code will output:
# 1
# 2
# 3
# 4
Usually, we don't want to list out each number in the range one by one. Instead, we create a range object. A range object can be created in one of three ways:
# Create a range with the number of values it should hold
# This range will hold the numbers 0 through 9
range(10)

# Create a range with a start and stop value
# The range includes the start value, but does NOT include the stop value
# This range will hold the numbers 5 through 19
range(5,20)

# Create a range with start, stop, and step values
# step controls the difference between values in the range
# A step of 2 means each number will be the previous number plus 2
# This range will hold even numbers from 0 through 98
range(0, 100, 2)
Using a range in a for loop, we can make a loop that runs 10 times:
for i in range(10):
  print(i)
Controlling a Motor With Gizmo
Now let's write a program that controls a motor connected to our Gizmo. This program will run the motor through at different speeds. To get started, connect a motor to your Gizmo using the Vex MC29 motor controller on motor port 1.
To start our program, we'll import the modules we need to use.
import pwmio
import time
import adafruit_motor.servo
import circuitpython_gizmo
For the setup portion of our code, we just need to setup a Gizmo object and an object to control the motor. To make sure we're creating the right kinds of signals for the Vex MC29 motor controller, we need to set the PWM frequency to 50 Hz, the min pulse width to 1000 milliseconds, and the max pulse width to 2000 milliseconds. We're using 50 Hz because it is the most common frequency used for servo PWM signals, and we happen to know it's what the Vex MC29 uses. The min and max pulse widths came from the "Inputs" details on the Vex MC29 product page.
gizmo = circuitpython_gizmo.Gizmo()
motor = adafruit_motor.servo.ContinuousServo(
    pwmio.PWMOut(gizmo.MOTOR_1, frequency=50),
    min_pulse=1000,
    max_pulse=2000
)
Next, create a while loop and refresh the Gizmo object.
while True:
  gizmo.refresh()
Then, still in the while loop, create a for loop that covers the range -10 to 10. The stop value needs to be 11 here because the range stops one value before the stop value.
for i in range(-10,11):
In the for loop, we'll set the motor throttle and use time.sleep() to let the robot run for a bit before setting the next speed. When setting the throttle, we need to change the loop variable to fit in the -1 to +1 range throttle expects.
    motor.throttle = i / 10.0
    time.sleep(0.5)
Finally, after the first for loop, add another that will loop in the opposite direction. This will cause the program to smoothly run the motor back and forth without jumping form full forward to full reverse. This loop will need to specify -1 as the step value so the loop value decreases in each iteration.
  for i in range(10,-11,-1):
    motor.throttle = i / 10.0
    time.sleep(0.5)
The full program looks like this:
import pwmio
import time
import adafruit_motor.servo
import circuitpython_gizmo

gizmo = circuitpython_gizmo.Gizmo()
motor = adafruit_motor.servo.ContinuousServo(
    pwmio.PWMOut(gizmo.MOTOR_1, frequency=50),
    min_pulse=1000,
    max_pulse=2000
)

while True:
  gizmo.refresh()

  for i in range(-10,11):
    motor.throttle = i / 10.0
    time.sleep(0.5)

  for i in range(10,-11,-1):
    motor.throttle = i / 10.0
    time.sleep(0.5)
note
Motors take a lot of power. Way more than can be safely pulled out of the USB ports on your computer. To run this program, you'll need to have a battery conected to your Gizmo board. Check the instructions around the Main Power Connector for more information on connecting this cable.
Recap
In this tutorial, we introduced the pwmio and adafruit_motor modules. We covered how to loop over a range of numbers and put all of this together to run a Gizmo motor through its range of speeds. We're just a few steps away from writing code to control our robot with a gamepad, in the next tutorial.