Gizmo Library
In the last tutorial we used the Servo library to control a motor. The Gizmo itself has a library that we referenced in the previous tutorial, but didn't dive into it deeply. Lets do that now and learn about what functions the Gizmo library includes.
Named Constants
The Gizmo library provides special names for a number of different items to make referring to them more intuitive and clearer. This isn't an excuse to not document your code, however, and you should still take time to produce thoughtful comments to help others and your future self understand what your program does!
The named constants that the <Gizmo.h> library provides can broadly be subdivided into 2 categories: items related to the gamepad, and items related to the Gizmo board itself.
Gamepad Values
On the recommended Logitech F130 gamepad, there are 2 joysticks, 1 POV hat, 2 triggers, 2 shoulder buttons, 4 thumb buttons, and 2 special buttons in the center area of the controller. If you push down on the joysticks themselves, you'll hear and feel a satisfying click because the joysticks are buttons too!
The gamepad has the following named axes. Axes values range from 0 to 255, with the neutral position at 127. The joysticks have a deadband, sometimes called a "detent" around this value to ensure that even with small manufacturing differences between gamepads when you let go of the joysticks they self-center and return to the 127 value.
GIZMO_AXIS_LX- Left stick X-AxisGIZMO_AXIS_LY- Left stick Y-AxisGIZMO_AXIS_RX- Right stick X-AxisGIZMO_AXIS_RY- Right stick Y-AxisGIZMO_AXIS_DX- D-pad/POV hat X-Axis. This will "snap" between 0 and 255.GIZMO_AXIS_DY- D-pad/POV hat Y-Axis. This will "snap" between 0 and 255.
Similarly, all of the buttons are named as well:
GIZMO_BUTTON_X- X buttonGIZMO_BUTTON_A- A buttonGIZMO_BUTTON_B- B buttonGIZMO_BUTTON_Y- Y buttonGIZMO_BUTTON_LSHOULDER- Left shoulder buttonGIZMO_BUTTON_RSHOULDER- Right shoulder buttonGIZMO_BUTTON_LT- Left triggerGIZMO_BUTTON_RT- Right triggerGIZMO_BUTTON_BACK- Center back buttonGIZMO_BUTTON_START- Center start buttonGIZMO_BUTTON_LEFTSTICK- Left joystick stalkGIZMO_BUTTON_RIGHTSTICK- Right joystick stalk
Gizmo Port Values
The Gizmo has a number of I/O interfaces for your use. These are divided up into names based on functions. The names correspond to the names on the diagram below:
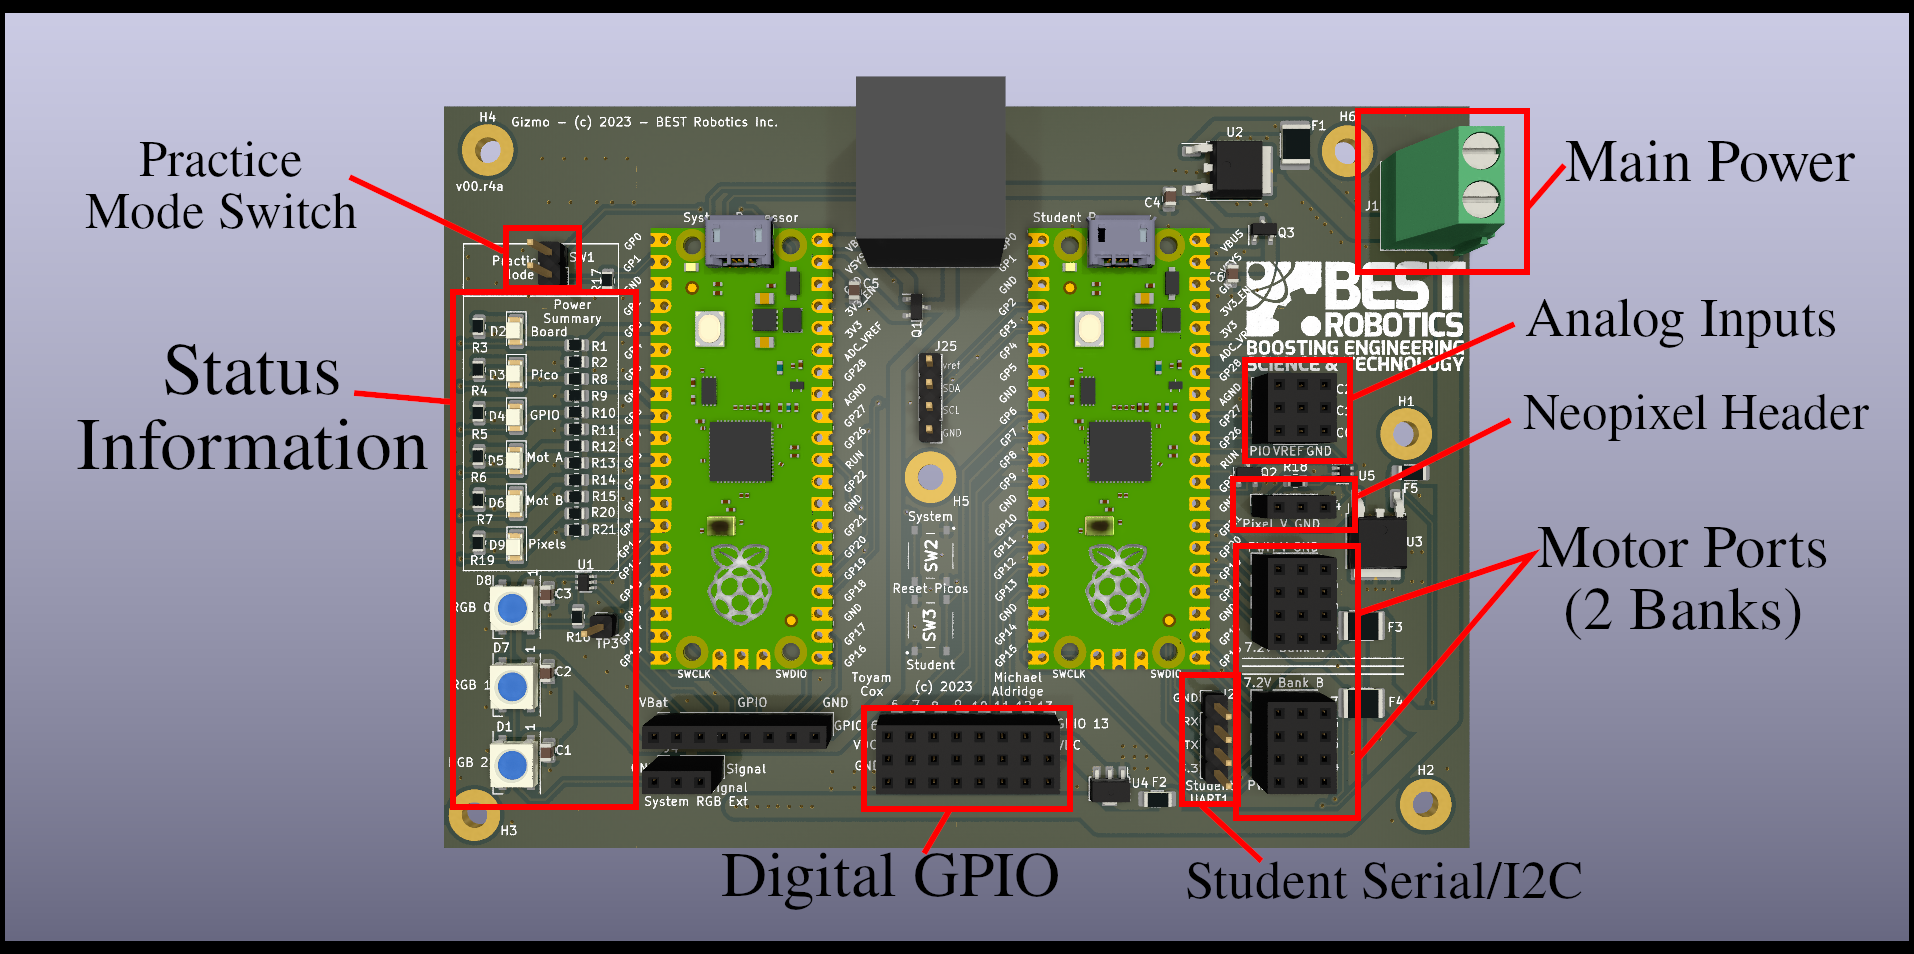
For motors, there are port names GIZMO_MOTOR_N where N is a number ranging from 1-8. On newer boards with dedicated servo ports, N ranges from 1-4 with an additional set of names GIZMO_SERVO_N to identify servo ports 1-4.
For digital I/O, the GPIO ports are numbered from 1-8, and can be referred to as GIZMO_GPIO_N where N is the port number you wish to address.
The Gizmo contains 3 analog to digital converters, that allow you to sense an analog value such as one that varies based on a potentiometer reading. These ports are identified as GIZMO_ADC_N where N is between 1-3.
warning
The analog ports must not be connected directly to the battery as doing so would harm the voltage measuring circuitry. Use only the power provided on the ADC port as the voltage reference!
For serial functions, the UART port is named with two special names for the TX and RX pins. These names are GIZMO_UART_TX and GIZMO_UART_RX. UART is a somewhat antiquated term to refer generally to a serial port. When looking at the above image, the pin order is top to bottom, ground, TX, RX, 3.3v.
Finally, the neopixel header where you can connect programmable LEDs is identified by the symbol GIZMO_NEOPIXEL.
Functions
The <Gizmo.h> library provides more than just names for pins. It provides a convenient way to interact with the field control server running on a driver station or full field management system. Using this functionality is very similar to using the Servo library. First we tell the compiler that we want to make use of the library in our program:
#include <Gizmo.h>
Then, at the top of the program outside the setup() and loop() functions we create a named instance of the library to use. For convenience, we'll call it gizmo in these docs, but you are free to name it any valid C symbol name.
Gizmo gizmo;
Then, in the setup() function, we can run the begin() funcion of the library to connect to the System Processor.
setup() {
    gizmo.begin();
}
Each time through the loop() function we need to refresh the data from the System Processor so that we can use any values that have changed. This is done by calling the refresh() method.
gizmo.refresh();
Finally, we can use the getButton(id) and getAxis(id) methods to retrieve the values of buttons and axes, respectively. The id parameter expected by these functions is one of the named constants described earlier
The button values are returned as boolean values of either true or false and can be used in conditional statements or other control structures. The axis information is returned as an unsigned 8-bit number (byte) ranging from 0-255, with the neutral position at 127.
Recap
We learned that the Gizmo library provides names for pins on the physical board as well as names for the various buttons and axes on the gamepad. We then learned that there are functions for accessing this information.