Driver Station
While it possible to use the Gizmo software and hardware with any computer, the Gizmo Team has developed software to provide an appliance-like experience using an embedded Linux system called a driver's station.
The station code is regularly tested using a Raspberry Pi Zero 2 W with a Waveshare Ethernet and USB hub. Though we don't actively qualify against the hardware, you should also be able to use our driver station system images on a Raspberry Pi 4B.
Physical Assembly
The driver's station comprises the Raspberry Pi Zero 2 W and the Waveshare board, which you will need to assemble. This need only be done once and once assembled there is no need to disassemble.
Consult the following graphic from the Waveshare documentation for assembly instructions, paying special attention to the order of the brass spacers that are used to assemble the PCB stack:
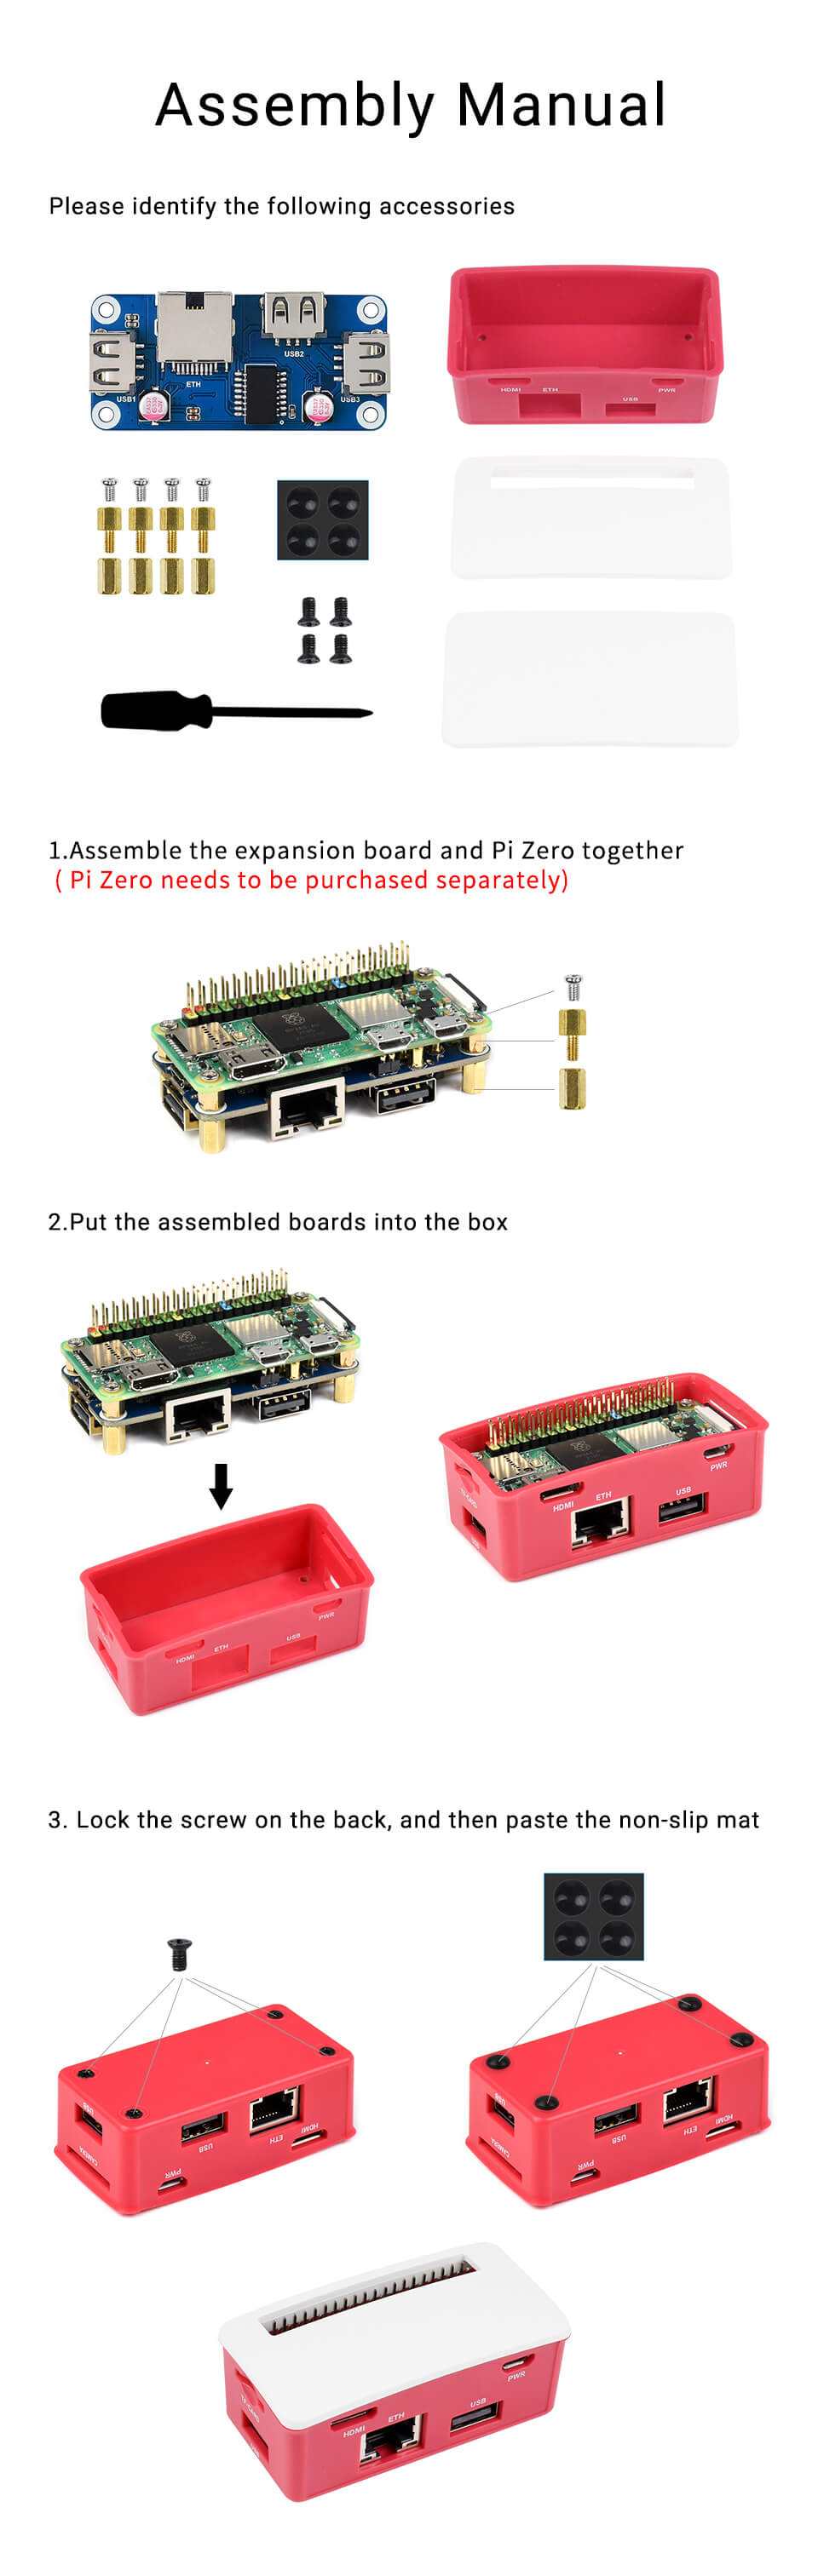
When installing the white cover plate, use the one without the cutout in it. Both are provided, but only the one without the cutout is required.
Software Installation
Once physical assembly is complete, you must install the software image that runs the driver's station. Ensure you have a means of writing a micro SD card for this step, using adapters if necessary.
tip
For first time setup of a never-before-used micro SD card, you can
instead flash ds-ramdisk.img.zip using Balena Etcher as described
in the appendix which will automatically
partition, format, and install the driver's station software to your
micro SD card. All other updates can then be performed using the
zip file as described below. Note that using Balena Etcher does
require one-time administrative access, and may not be suitable for
unprivileged student computers in schools.
Once you have imaged the disk with etcher, be sure to change the
name to GIZMO<NUMBER> as described below.
note
If this procedure doesn't appear to work for you, you may need to repartition your micro SD card. This can happen on some newer Windows 10 and Windows 11 machines where inappropriate defaults are selected.
If you have come here from the repartitioning guide, skip directly
to the step below where you extract the ds-ramdisk.zip file.
Obtain the latest system image from the GitHub releases page. For the driver's station, use the ds-ramdisk.zip file. The following instructions will be shown using Microsoft Windows, but similar instructions may be followed on other operating systems.
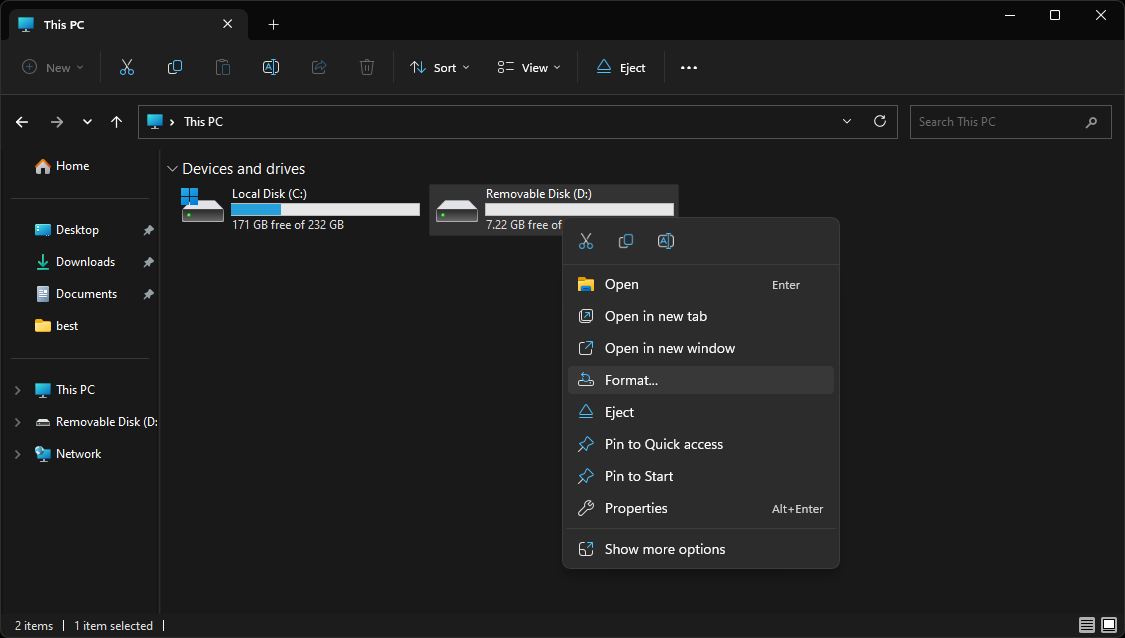
Begin by inserting the Micro SD card into a reader and plug it into your PC. Open Windows Explorer, select 'This Computer' and right click on the inserted (blank) drive. In the context menu, choose the "format" option.
In the resulting format window, leave all options at the default, but fill in the Volume Label field. This field is case sensitive and should take the format of GIZMO<NUMBER> where <NUMBER> is the number of the team that should be associated with this driver's station. Do not left-pad the number field (#452 should be 3 digits, not having a leading zero).

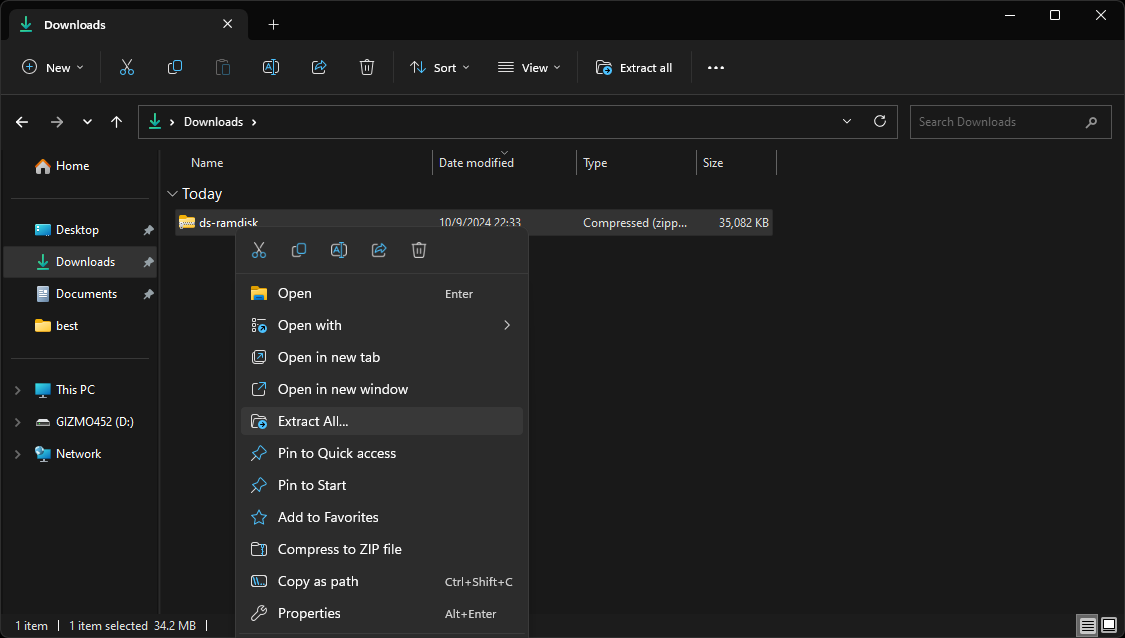
The format process will take several seconds, and once it completes the disk will re-attach as a named volume starting with GIZMO. Proceed by locating the ds-ramdisk.zip file you downloaded earlier and right-click it. In the context menu, select 'Extract All'.
In the resulting file extraction wizard window, select "Browse..." which will open a file browser window. In this window, select the GIZMO disk from the left sidebar. Select the drive itself.
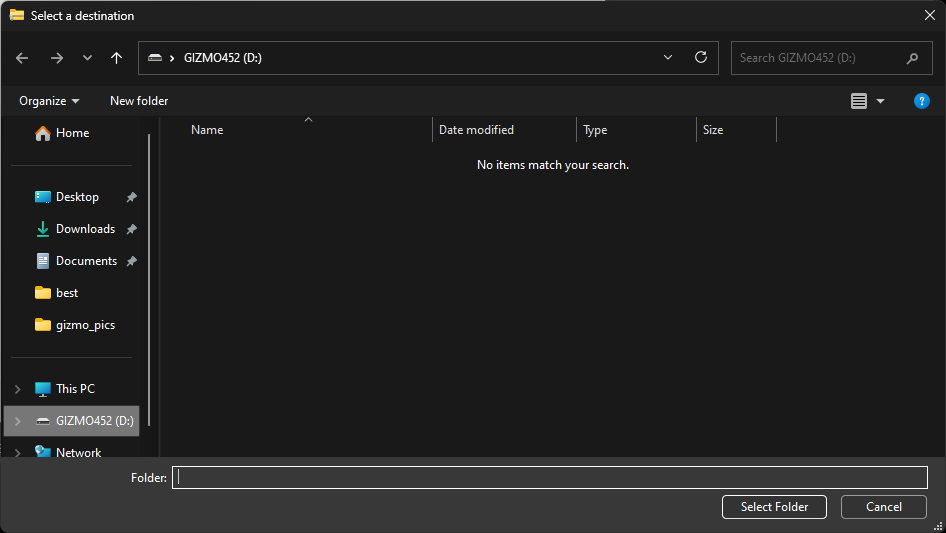
Once you have made your selection, the extraction wizard will be ready to proceed. Configured, it should look like this:
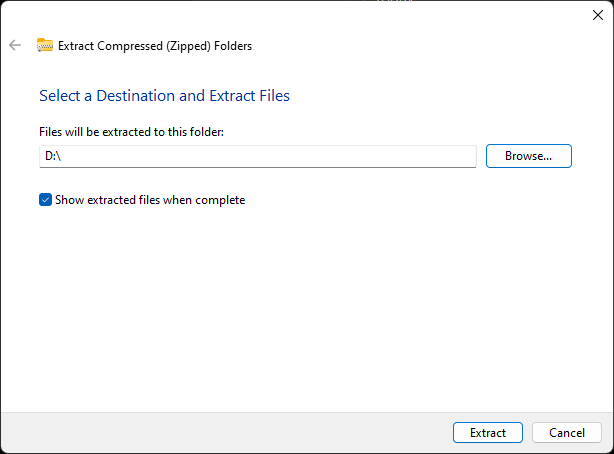
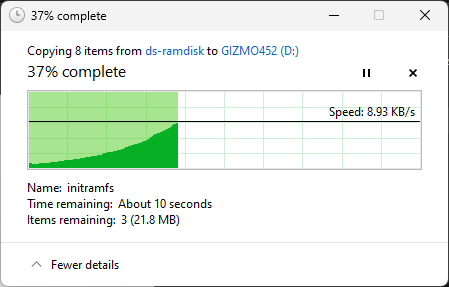
The extraction wizard will show a top level disk, in this case, the 'D' drive. Click 'Next' and a progress window will appear:
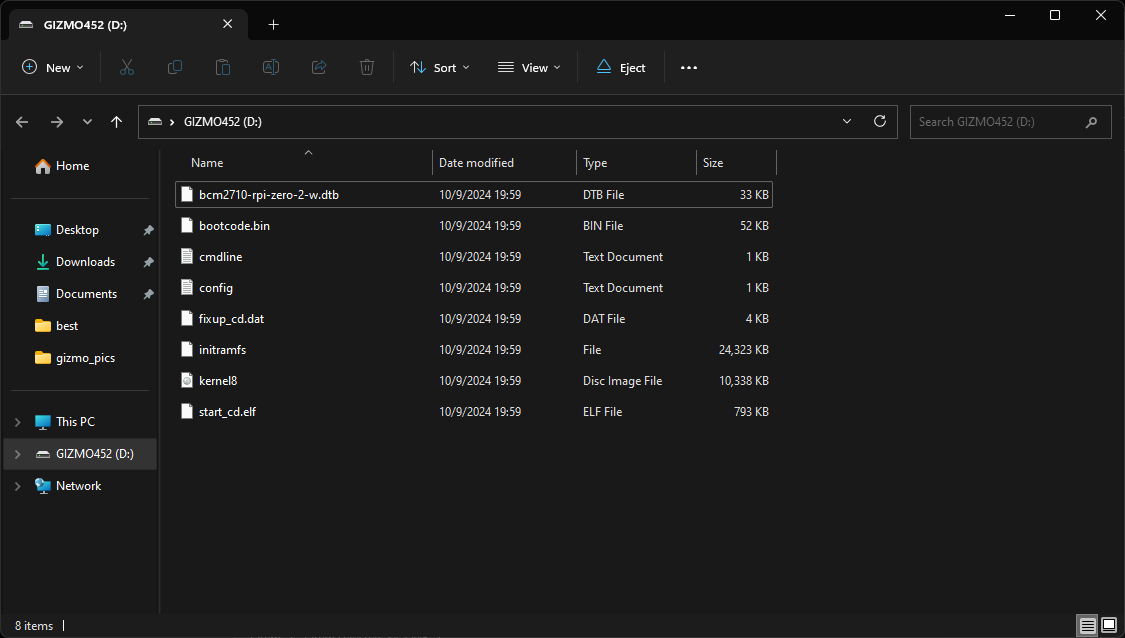
Once the extraction completes, the Gizmo disk will re-open and now contain files:
Eject the disk. Wait for either Windows to remove the drive and say it is safe to disconnect, or 30 seconds after clicking eject. Install the card into the labeled slot on the case labeled "TF Card". The card should be installed with the metal contacts facing the bottom of the case, and take care to insert the card into the reader. Its easy to miss the reader and just push the card into the case if you're not careful.
note
If you've been using the Gizmo for a while, you may be wondering
where the gsscfg.json file is. This file has been obsoleted. You
can still use one if you'd like, but the team number is now read
from the volume label, and other values are derived from the driver
station's hardware IDs.